Cache
The community-made classic set in the shadow of Chernobyl, back in the Active Duty pool for the first time since 2019. A clean three-lane layout where mid control and disciplined rifling decide everything.
Harita radarı
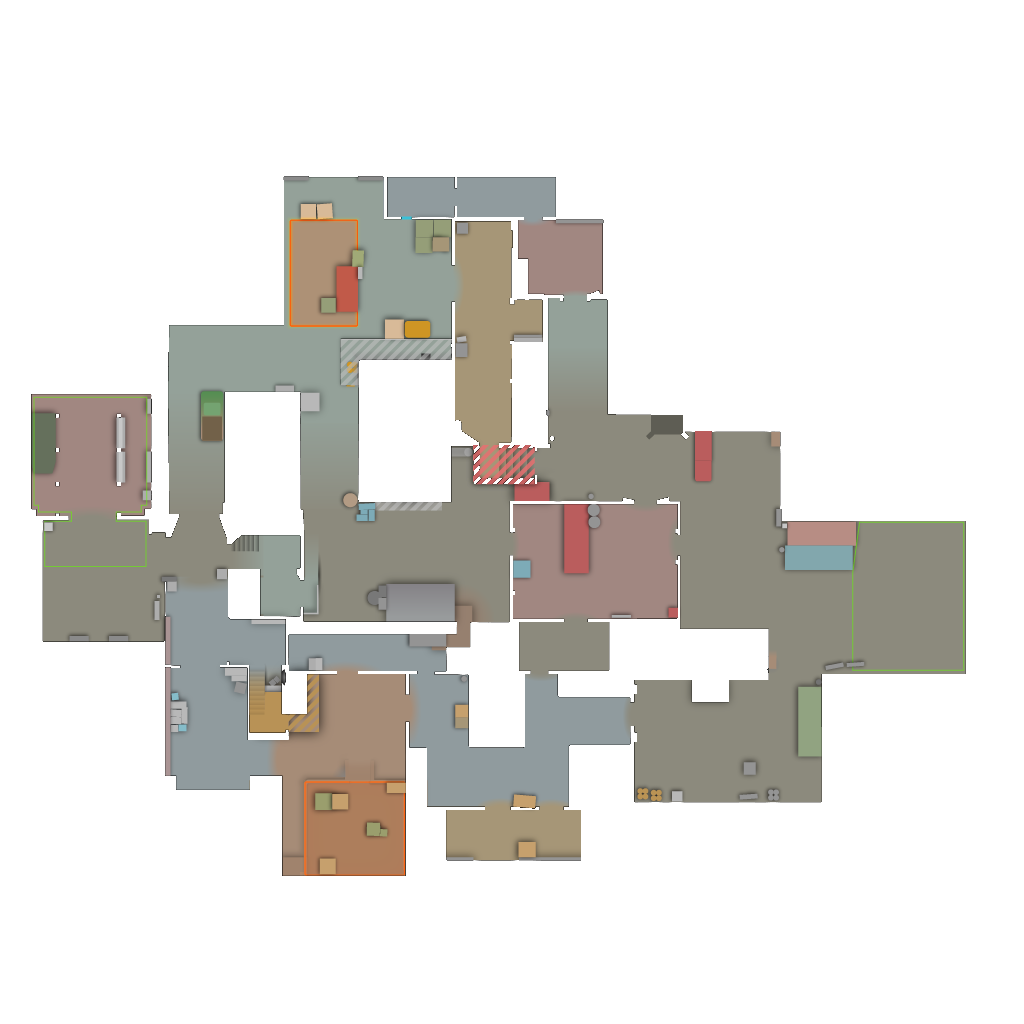 A BoostA HallsA MainA StairsB HallsB MainBack HallBearA SiteB SiteBoostBus StopCT LaneCT SpawnCatwalkCheckersConnectorCornerCubbyElectrical BoxFork LiftGarageHeadshotHeavenHighwayLadderLockersA LongMidMid RoofMiddleOutside AOutside BPlaygroundQuadRaftersRedSandbagsSqueakySun RoomT SpawnT TruckT YardToxicTree RoomTruck (CT)UselessVents
Profesyonel rekabet istatistikleri
Tüm callout’lar (50 pozisyon)
CT tarafı (28)
A Site
The A bombsite between Quad, Forklift, and the Main entrance — open, with deep box cover.
NBK
The corner pocket between the Squeaky door and Quad, another pro-named hiding spot.
Quad
The stack of four boxes at the back of A site — the site's main cover and post-plant anchor.
A Default
The standard A plant location, protected by the site boxes and visible from Main post-plants.
Forklift
The forklift on the A site — front-site cover during entries and retakes.
Balcony
The raised metal platform above Forklift overlooking the site.
Cubby
The nook below Boost pressing against A Main — a close-range surprise position.
Elektro
The area between Truck, A site, and Highway on the CT side of A.
Truck (CT)
The truck between Elektro and CT Halls — cover on the CT approach to A.
Highway
The narrow rise connecting mid to the A site — the CT rotation lane and a strong AWP angle.
CT Connector
The room linking mid to CT Halls and CT spawn — the defence's central rotation hub.
B Site
The raised B bombsite, entered from B Main and Checkers with Heaven watching from above.
B Ramp
The ramp climbing onto the B plant platform.
Pit
The dip beside the ramp on B site — low cover for anchors and post-plants.
B Default
The standard B plant spot behind the front boxes, coverable from B Main.
New Boxes
The tall grey boxes on the B Halls side of the site.
Spray (Back Site)
The area behind the boxes at the back of B site.
Close Left
The tight left corner entering B from Hell — checked on every retake.
Headshot
The lower Hell/Heaven-side spot on B giving a head-height angle over the site.
Checkers
The checkered-floor room connecting Vents and B Main — the pivot of every B-side fight.
Back Checkers
The space behind the boxes at the rear of Checkers.
Heaven
The wooden platform above B site reached from CT Halls — the strongest defensive angle on B.
Rafters
The raised metal walkway that Heaven leads onto, overlooking the site.
Blue
The area under Rafters by the blue wall on B site.
Hell
The ground-level area beneath Heaven — the lower half of the CT retake pincer onto B.
Tree
The platform by the large tree at the back of Hell.
CT Halls
The large connector between Truck and Hell — the CT superhighway between A, mid, and B.
CT Spawn
Counter-Terrorist spawn on the east edge behind CT Halls and Connector.
T tarafı (16)
T Spawn
Terrorist spawn on the west edge, with routes to A Long, Garage/Mid, and B Halls.
T Truck
The truck between T spawn and A Long — an early-round reference point and boost spot.
T Boxes
The box cluster between T spawn and B Halls.
Garage
The large building between T spawn and mid — the T-side key to mid control.
T Red
The red shipping container inside Garage, climbable for angles into mid.
A Long
The lane from T spawn/Garage toward Squeaky and A Main.
A Main
The wide main entrance into A site from the T side of the map.
Lockers
The locker section of A Main visible from the site — cleared before every Main push.
Squeaky
The room with the blue squeaky door opening onto A site — the second A entrance; its sound telegraphs entries.
Shroud (Boost Boxes)
The corner boxes between Squeaky and A Main, named after the famous player — a sneaky T hold on site hits.
B Main
The area between B Halls, Checkers, and the site — the primary B entrance.
B Main Boxes
The boxes near the Checkers entrance where CTs hide to surprise B pushes.
B Halls
The interior corridor between T spawn, Dumpster, and B Main — the T staging area for B.
Dumpster
The room connecting Garage to B Halls — the link between the mid and B lanes.
Sun Room
The room with the sun mural off B Halls, with a window used for utility onto B site.
Toxic
The yellow barrel corner at the back of Sun Room.
Mid kontrolü (6)
Mid
The central lane connecting Garage, Connector, and Highway — the axis the whole map turns on.
White Box
The white crate on the Highway side of mid — the classic CT AWP position.
Sand Bags
The sandbags between Connector and Mid Roof — CT-side cover in the mid fight.
Mid Roof
The rooftop between Vents and Sandbags overlooking the mid lane.
Boost
The T-side rooftop reachable only via teammate boost — the famous pick spot over mid.
Vents
The vent system connecting mid to Checkers — the split route into B once mid is controlled.
Taktik ipuçları
Mid is the map: win Garage vs White Box and every route opens.
Never open Squeaky dry — the door's sound plus a pre-aimed Quad rifle is a free CT kill.
Use the Vents squeeze behind a B Main hit; the two-direction entry breaks anchors.
As CT, protect Heaven — B site without Heaven support falls to any organised execute.
Post-plant on A, spread between Quad, Shroud boxes, and Main so one flash cannot clear you.
Yaygın stratejiler
T tarafı saldırısı
Garage Take → Mid Split
Smoke White Box and flash from Garage to claim mid, then split toward A via Highway/Connector or B via Vents depending on the CT response.
Full A Execute
Smoke Highway and Truck, molotov Squeaky's exit and Quad, then enter Main and Squeaky together. Plant Default and hold from Quad, Shroud boxes, and Main.
B Main + Vents Squeeze
Three players hit B Main behind Heaven/CT smokes while two drop Vents into Checkers. The pincer forces the anchor to fight two directions at once.
Fast B Rush
Straight through B Halls with a flash wave over the entrance and a Heaven smoke. Beats slow setups before Checkers and Heaven positions are set.
CT tarafı savunması
Mid AWP Lock
The AWP holds mid from White Box with a Connector support; Garage aggression is answered with utility, freeing the rest to play standard site holds.
Heaven-Hell Retake
Concede the B plant when outnumbered, then retake in a layered wave — flash down from Heaven, swing Hell and Checkers simultaneously, and clear Quad/back boxes in sequence.
Sıkça sorulan sorular
- Cache haritasındaki önemli callout’lar nelerdir?
- Cache haritasında CT tarafı, T tarafı ve mid bölgesine dağılmış 50 önemli callout pozisyonu bulunur. Bu callout’ları öğrenmek, rekabetçi maçlarda takım iletişimi için şarttır.
- CT’ler Cache haritasını nasıl savunmalı?
- Cache haritasında CT savunması; dar açılardan oynamaya, utility ile erken bilgi toplamaya ve T tarafının execute’larına göre rotasyon yapmaya odaklanmalıdır. Crossfire kurulumları ve kontrollü agresiflik, site kontrolünü korumaya yardımcı olur.
- Cache için en iyi T tarafı stratejisi nedir?
- En iyi T tarafı yaklaşımı, utility’ne ve takım koordinasyonuna bağlıdır. Bir site’a yüklenmeden önce bilgi toplayan default kurulumlar genellikle en güvenlisidir. Hızlı execute’lar, elinde tam utility olduğunda en iyi sonucu verir.
- Cache haritasında mid kontrolü ne kadar önemli?
- Cache haritasında mid kontrolü çok önemlidir çünkü her iki tarafa da rotasyon seçenekleri ve harita kontrolü sağlar. Mid’i kontrol eden takımlar, raund planlamasında ciddi bir stratejik avantaj elde eder.
- Cache haritasında hangi utility’ye öncelik vermeliyim?
- Önemli choke point’ler için smoke’lara, giriş desteği için flash’lara ve yaygın pozisyonları temizlemek için molotov’lara öncelik ver. Cache haritasında tam utility, oyuncu başına genellikle 1000-1500 $ civarında maliyet çıkarır.
Cache callout’larını İngilizce görüntüle →