Anubis
An Egyptian temple city split by canals. Anubis is a modern, water-crossed three-lane map where mid and Water control open flexible splits onto both sites.
Radar do mapa
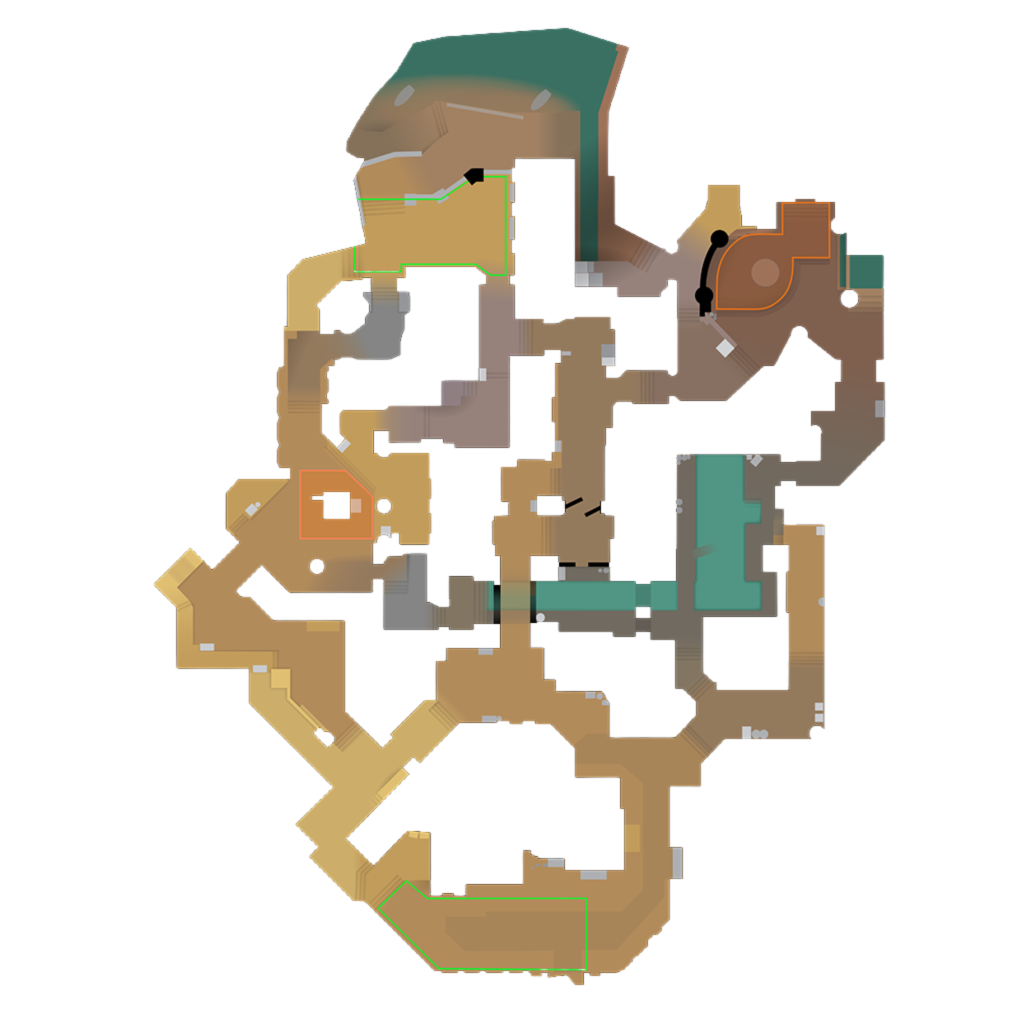 AlleyBack of BA SiteB SiteBricksBridgeCT Side UpperCT SpawnCanalConnectorFountainHeaven (Ruins)Lower TunnelMainMid DoorsMiddleOutside LongPalace InteriorRuinsSnipers NestStreetT Side UpperT SpawnT StairsTunnelTunnel StairsWalkwayWater
Estatísticas do jogo profissional
Todos os callouts (41 posições)
Lado CT (19)
Street
The lane below the Sniper position running from CT spawn toward B site.
A Site
The open A bombsite plaza around its central pillar, entered from Main and Connector.
Fountain
The raised fountain platform in front of A Main — entry cover and a post-plant anchor.
Headshot
The boxes on A site giving CTs a head-height angle onto the Main entrance.
Plateau
The spacious raised area on the A site granting access toward Heaven.
Heaven (A)
The elevated CT platform overlooking A site — smoked on every serious A hit.
Tunnel
The indoor corridor from CT spawn up to A Heaven — the CT rotation route to A.
Back Site (A)
The rear of the A bombsite toward the CT side, near the gated door.
B Site
The pillared B bombsite plaza, entered from B Long/Gate, Palace, and Street.
Pillar
The close-right pillar entering B from Long — always cleared before crossing the site.
Corner
The close-left triangle entering the B site — a classic anchor off-angle.
Default (B)
The standard B plant spot near the front of the site, coverable from Gate and Palace.
E Box
The indoor nook connecting Middle toward the B site — a sneaky rotation cut-through.
Back Site (B)
The rear of B behind the large pillars, out of sight of Gate.
Ninja
The hidden corner beside B Back Site used for sneaky holds and ninja defuses.
Sniper
The elevated window position overlooking the B site entry — the strongest CT angle on B.
Cave
The cavern walkway from CT spawn toward the B side of the map.
CT Spawn
Counter-Terrorist spawn at the north, feeding A via Tunnel and B via Street/Cave.
Beach
The sandy shoreline behind CT spawn with the beached boat — rarely contested, useful for flanks.
Lado T (11)
T Spawn
Terrorist spawn at the south of the map, splitting toward A Main, Top Mid, and B Long/Ruins.
Alley
The lane out of T spawn giving access toward mid and the B half of the map.
Ruins
The broken-temple area between T spawn and B Long, connecting toward Top Mid.
Heaven (Ruins)
The raised vantage point in Ruins overlooking B Long — a T-side pick spot before B hits.
Stairs
The steps dropping from Alley down into the Water/canal level.
Upper
The raised T-side area above Drop used to control the Water entrance.
Drop
The drop-down from the T upper level into the Boat/canal area.
A Main
The primary T entrance to A site from the canal/Water side.
B Long
The main ground route from Ruins to the B site, ending at Gate.
Gate
The large archway from B Long into the B site — the choke every B execute must open.
Ivy
The small overgrown pocket outside Gate, cover for Ts staging a B hit.
Controle do mid (11)
Top Mid
The T-side entrance to mid leading toward Bridge and Double Doors.
Bridge
The elevated walkway across mid toward Double Doors — the upper of the two mid routes.
Double Doors
The twin doors at the center of the map between Bridge and the CT-side Middle area.
Middle
The open CT-side central area behind Double Doors, connecting Street, Connector, and Palace.
Water
The canal running beneath the Bridge line — the lower mid route linking T side to Connector and Boat.
Canal
The wider waterway system feeding Water, Boat, and the B-side crossings.
Boat
The flooded chamber with the boat beside the canal, between Water and the A half.
Wood
The wooden-floored corner beside Boat — a reference point in canal fights.
Arches
The double archways in the canal heading toward the A side of the map.
A Connector
The narrow walkway linking Middle to A site — the split route on A executes.
Palace
The large indoor hall connecting Middle, T side, and B site — the third route on B splits.
Dicas táticas
Water control is quiet power: walking the canal unlocks Connector and both sites.
Smoke the elevated angles (A Heaven, B Sniper) before every site hit.
Use Palace as the second wave on B splits, not the first — it collapses onto a started fight.
As CT, contest Top Mid or Water early; conceding both gives Ts the whole map.
Track which routes were cleared — untouched canals are free flank paths for retakes.
Estratégias comuns
Ataque pelo lado T
Water Take → Connector Split A
Sneak Water, then hit A through Main and Connector simultaneously with Heaven smoked. The two-direction entry unstacks the site pair instantly.
Full B Execute
Smoke Sniper and Street, flash through Gate, and enter with a Palace pair joining as the site fight starts. Plant Default and hold from Gate, Palace, and Back Site.
Mid Pressure Default
Fight Bridge/Double Doors with utility while a Water lurker slips under. Whichever mid route the CTs commit to, take the other and split the weak site.
Late Three-Way B
Hold map control quietly, then hit B in the last 25 seconds from Long, Palace, and Street/E-Box at once — rotations cannot arrive in time.
Defesa pelo lado CT
Aggressive Mid Duo
Two CTs take Double Doors and Bridge with flashes at round start, denying Top Mid and letting the AWP hold Water. Collapse back through Middle on site hits.
Sniper Re-Peek
The B anchor plays the site pillars while the support returns to the Sniper window as execute smokes fade, catching planters and post-plant positions from above.
Perguntas frequentes
- Quais são os callouts principais em Anubis?
- Anubis tem 41 posições principais de callout distribuídas pelo lado CT, lado T e a região do mid. Aprender esses callouts é essencial para a comunicação da equipe durante as partidas competitivas.
- Como os CTs devem defender Anubis?
- A defesa CT em Anubis deve focar em jogar ângulos fechados, coletar informações cedo com utility e rotacionar com base nos executes do lado T. Setups de crossfire e agressão controlada ajudam a manter o controle do site.
- Qual é a melhor estratégia de lado T para Anubis?
- A melhor abordagem pelo lado T depende do seu utility e da coordenação da equipe. Setups default que coletam informações antes de comprometer com um site costumam ser os mais seguros. Executes rápidos funcionam melhor quando você tem utility completo.
- Qual é a importância do controle do mid em Anubis?
- O controle do mid é crucial em Anubis, pois oferece opções de rotação e controle do mapa para os dois lados. Times que controlam o mid ganham uma vantagem estratégica significativa no planejamento do round.
- Qual utility devo priorizar em Anubis?
- Priorize smokes para os choke points principais, flashes para dar suporte na entrada e molotovs para limpar posições comuns. O utility completo em Anubis costuma custar em torno de US$ 1000-1500 por jogador.
Ver os callouts de Anubis em inglês →