Dust 2
The most iconic map in Counter-Strike history. A clean three-lane layout with long sightlines, fast rotations, and the purest aim duels in the game.
Radar do mapa
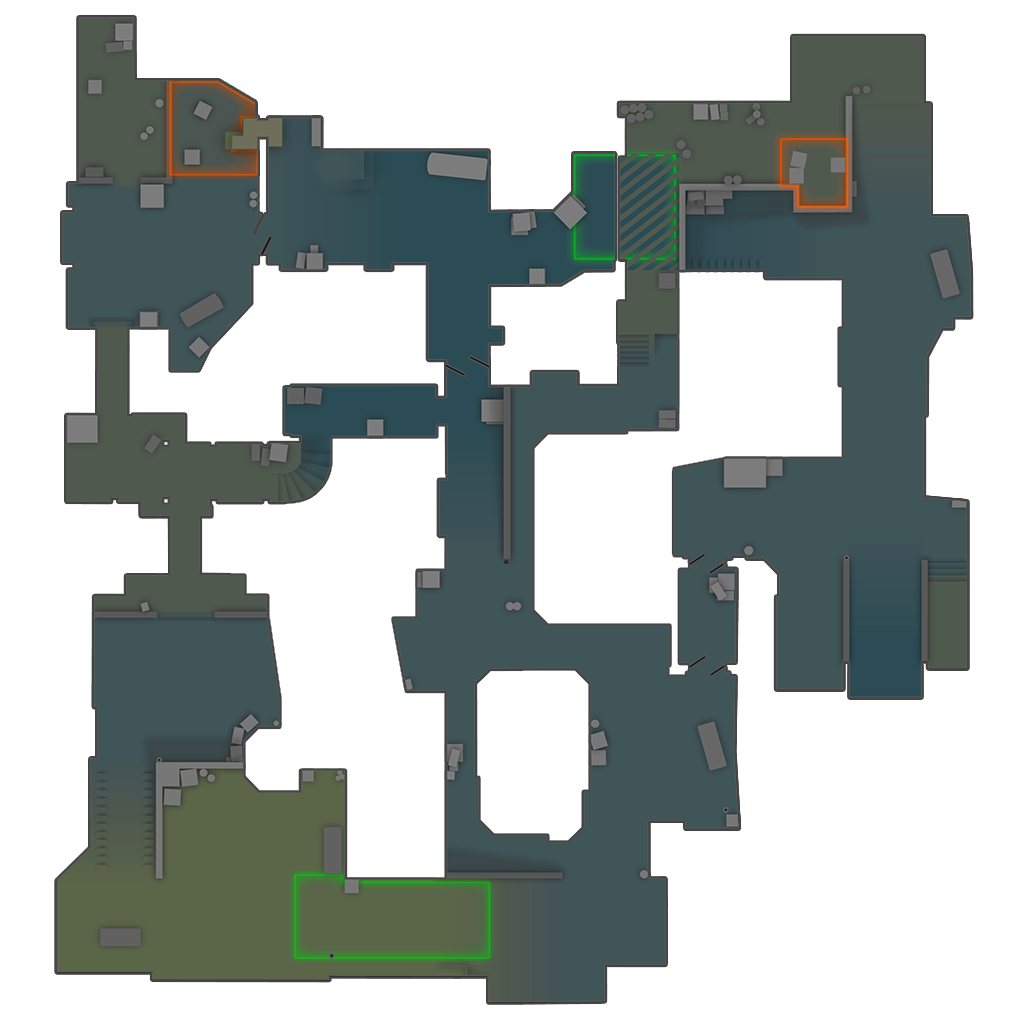 A RampB DoorsA SiteB SiteCT SpawnA Short (Catwalk)Extended AHoleA LongLong DoorsLower TunnelsMid DoorsMidOutside LongOutside TunnelsPitShort StairsSideT RampT SpawnTop of MidTunnel StairsUnder AUpper Tunnels
Estatísticas do jogo profissional
Todos os callouts (50 posições)
Lado CT (32)
A Site
The A bombsite on its raised platform, reached from Long, Short/Catwalk, and CT spawn.
A Default
The standard A plant spot on the edge of the raised platform, visible from Long post-plant positions.
Goose
The enclosed corner behind the A platform, named after old goose graffiti — a common CT hiding spot.
Barrels
The barrels behind A site near the mesh fence, beside Goose.
Elevator
The corner of the A platform closest to CT spawn — an off-angle against Short pushes.
A Ramp
The ramp rising from A Cross onto the bombsite platform.
A Cross
The open ground between Long and the A site that both teams must cross — usually smoked during hits.
A Car
The car on A Long near the site — cover for Long lurkers and the classic post-plant spot.
A Long
The long corridor from Long Doors to the A site — home of the map's biggest AWP duels.
Pit
The sunken area at the end of A Long by the doors — a strong CT hold and T post-plant position.
Side Pit
The shallow ground between Pit and Long Doors.
Pit Plat
The raised platform beside Pit, giving an elevated angle over Long.
Short Boost
The dumpsters outside CT spawn used to boost toward Short/Catwalk angles.
A Ninja
The hidey-hole behind boxes near A Short used for ninja defuses and sneaky holds.
Close Mid Doors
The near corner just CT-side of Mid Doors, a sneaky close hold against door pushes.
CT Mid
The area between Mid Doors and B Doors leading to CT spawn — the CT half of mid and the B-split route.
CT Spawn
Counter-Terrorist spawn behind A site, feeding rotations through CT Mid and A Ramp.
B Site
The enclosed B bombsite, defended from Car, Closet, Plat, and the Window/Doors area.
B Default
The common B plant spot near the front boxes, coverable from tunnels post-plant.
Close (B)
The left corner immediately out of the tunnel exit — the classic close CT off-angle.
B Car
The car on B site right of the tunnel exit — a standard anchor position.
B Closet
The nook by the car at the site's edge — hides a CT from tunnel peeks.
Fence
The fenced wall section on B site providing a hiding spot toward the back.
B Plat
The raised platform on B site near the plant zone.
Back Plat
The deep end of B Plat — an anchor spot that survives the first wave of a rush.
Big Box
The large box on B site (the "site Xbox") used for cover in retakes and post-plants.
Double Stack
The two stacked boxes mid-site on B — close-quarters cover during site fights.
B Window
The hole in the wall overlooking B site from CT Mid — a key retake and support angle.
B Doors
The double doors between CT Mid and B site — the CT rotation route into B.
B Boxes
The boxes between CT Mid and B Doors that cover CTs rotating in.
Scaffolding
The building materials outside B near Window, climbable for angles into the site.
B Back Site
The rear area of B behind all the boxes — the last space cleared on site takes.
Lado T (10)
Long Corner
The corner by the first building inside Long Doors — cleared by CTs pushing and Ts exiting alike.
Long Doors
The double blue doors between Outside Long and A Long — the flashpoint of every Long fight.
Outside Long
The open area between T spawn and Long Doors where Ts stage before taking Long.
Blue
The blue shipping container opposite Long Doors, used for cover and boosts on the T side.
T Spawn
Terrorist spawn, with exits to Outside Long, Suicide/Mid, and T Ramp toward Tunnels.
T Ramp
The ramp from T spawn down toward Outside Tunnels.
T Plat
The raised platform beside T spawn overlooking the tunnel approach.
Outside Tunnels
The open square between T Ramp and the Upper Tunnels entrance.
Upper Tunnels
The main tunnel from the T side to B site — the choke every B rush must pass.
Lower Tunnels
The lower tunnel connecting Outside Tunnels to mid — the flank route between B and mid.
Controle do mid (8)
A Short (Catwalk)
The elevated walkway from mid up the stairs toward A site — the "short" route to A.
Stairs
The steps connecting Catwalk to the A Short platform — the choke CTs hold against Short hits.
Mid
The central corridor from Top Mid down to Mid Doors, linking T spawn to both sites.
Top Mid
The T-side end of mid below Suicide, where Ts gather info and set up Catwalk takes.
Suicide
The exposed drop from T spawn into mid — peeking it into a CT AWP is the map's famous coin-flip.
Mid Doors
The double doors halfway down mid — the AWP battleground at round start.
Xbox
The iconic box in mid beside Catwalk — smoked and used as a boost to get Ts onto Short safely.
Palm
The mast (formerly a palm tree) at the top of mid next to Catwalk — a positional reference for mid fights.
Dicas táticas
Respect the mid-doors AWP: smoke it or don't cross it.
Never take the Long fight without a flash — the doors duel is winner-takes-half-the-map.
Use the Xbox smoke to convert mid control into a safe Short presence.
As CT, one smoke on the tunnel exit breaks a B rush better than any hero peek.
Post-plant A, hold the CT-cross line from Pit and Car instead of sitting on site.
Estratégias comuns
Ataque pelo lado T
Long Take → A Hit
Flash through Long Doors, claim Pit and Car, then smoke CT-cross and hit the site with a Catwalk player crossing simultaneously. Post-plant holds from Pit/Car are brutal to retake.
B Tunnels Flood
Five players hit Upper Tunnels with a Window smoke and stacked flashes over the exit. Speed beats the rotation — plant fast and set up on Plat, Car, and back in Tunnels.
Mid-to-B Split
Take mid control, smoke Window and Doors from CT Mid, then squeeze B from Doors and Tunnels at once. The pincer removes the anchor's safe angles.
Double-AWP Mid Lock
Two AWPs hold Suicide and Top Mid at round start to farm the doors duel, converting picks into whichever site is left thin.
Defesa pelo lado CT
Layered Long Defence
Aggressive doors flash-peek for the opening pick, then reset to Pit and site angles. Forces Ts to re-clear Long in stages every round.
B Off-Angle Rotation
The B pair alternates between Car/Closet close holds and deep Plat positions, with the mid AWP collapsing through Window on first contact.
Perguntas frequentes
- Quais são os callouts principais em Dust 2?
- Dust 2 tem 50 posições principais de callout distribuídas pelo lado CT, lado T e a região do mid. Aprender esses callouts é essencial para a comunicação da equipe durante as partidas competitivas.
- Como os CTs devem defender Dust 2?
- A defesa CT em Dust 2 deve focar em jogar ângulos fechados, coletar informações cedo com utility e rotacionar com base nos executes do lado T. Setups de crossfire e agressão controlada ajudam a manter o controle do site.
- Qual é a melhor estratégia de lado T para Dust 2?
- A melhor abordagem pelo lado T depende do seu utility e da coordenação da equipe. Setups default que coletam informações antes de comprometer com um site costumam ser os mais seguros. Executes rápidos funcionam melhor quando você tem utility completo.
- Qual é a importância do controle do mid em Dust 2?
- O controle do mid é crucial em Dust 2, pois oferece opções de rotação e controle do mapa para os dois lados. Times que controlam o mid ganham uma vantagem estratégica significativa no planejamento do round.
- Qual utility devo priorizar em Dust 2?
- Priorize smokes para os choke points principais, flashes para dar suporte na entrada e molotovs para limpar posições comuns. O utility completo em Dust 2 costuma custar em torno de US$ 1000-1500 por jogador.
Ver os callouts de Dust 2 em inglês →