
One of Counter-Strike’s best features is the freedom the game gives players to tweak their settings and find the perfect fit. Intermediate to advanced CS2 players often use the in-game console to customize their settings and enhance their practice sessions using a handful of useful CS2 commands.
Though all this sounds good, console commands are only possible if players can access the in-game console. If you do not have the console enabled, this guide will teach you the exact procedures to turn it on!
What Is The CS2 Console Used For?
The Counter-Strike developer console is entirely free to use and safe; typing in commands will not get you banned, as the feature is used by millions, including 99.99% of professional players.
Using the CS2 console, players can input specific commands that will perform different useful functions. These commands can help players customize their crosshairs, change private server settings to suit a practice session, adjust specific keybinds, and even disable visual details to increase their FPS performance in the game.
How To Enable The Console In CS2
So far, the developer console might seem extremely complicated and intimidating for a new player, but it is easier to understand than you might think. The first step to utilizing the console is to enable it in the game.
There are two primary ways of activating the console, and both procedures are incredibly straightforward. Let’s go over them step by step.
Method 1: Through In-Game Settings
The primary method to enable your developer console can be done through the in-game settings menu.
To turn on your console through the CS2 in-game settings, follow these steps below:
- Launch the Counter-Strike 2 client.
- Go to the Settings page by clicking the gear icon on the top left corner of your screen.
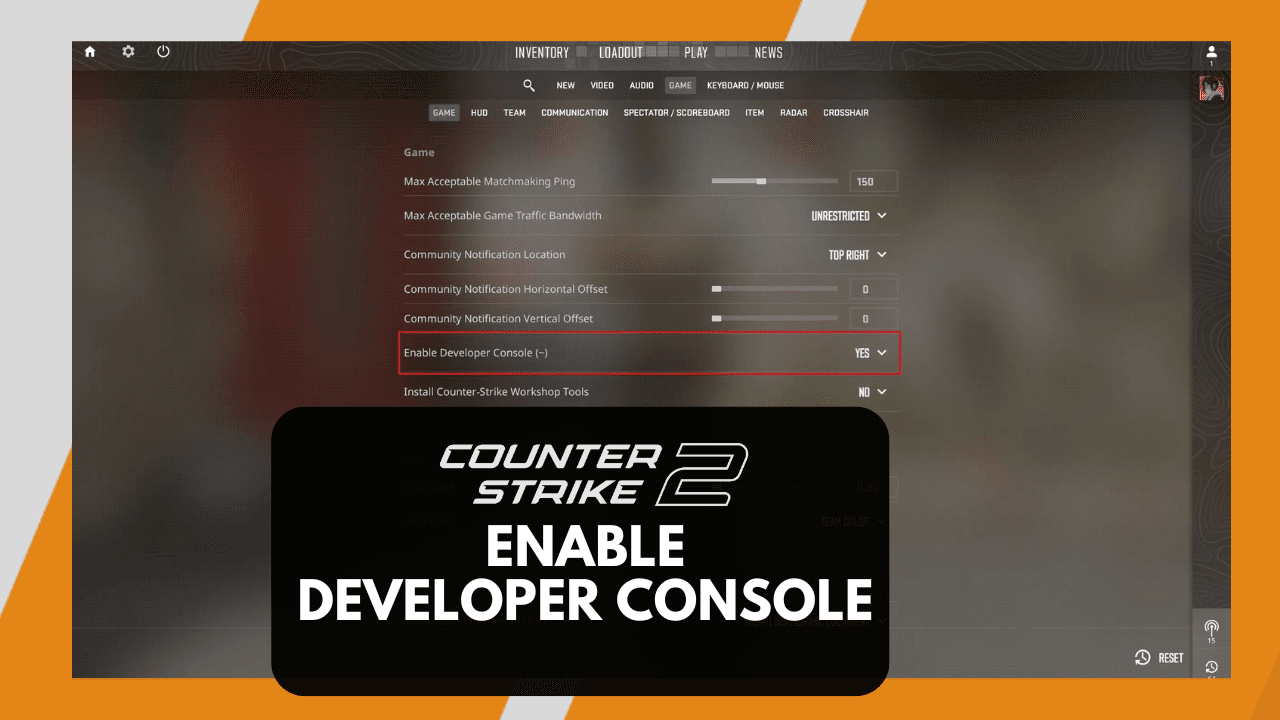
- Next, go to the Game section.
- The first option you see should read “Enable Developer Console”.
- Change the option from “No” to “Yes”.
And that’s pretty much it! You do not have to save your settings; the game automatically saves your changes. After changing the option, you will immediately have access to the developer console without restarting the game.
Method 2: Through The Launch Options
If you were not able to enable the console through your in-game settings for any particular reason, don’t lose hope. There is a second method that isn’t too tricky to follow.
To turn on your console through the CS2 launch options, follow these steps below:
- Exit Counter-Strike 2 and open your Steam Client.
- In your Steam Client, go to your Game Library.
- Next, look for Counter-Strike 2.
- Right-click the game name and go to Properties.
- In the General section of your Properties window, look for Launch Options.
- Using the text box provided, type “-console”.
Once you have entered the “-console” launch option, you can close the window as Steam immediately saves your changes.
With it being a launch option, your console will always be enabled whenever you launch the game, even if you update the game or change any in-game settings.
How To Open The CS2 Console
Once you have completed either method to enable the console, you can open it at will.
Opening the developer console can be done by pressing the tilde key (“~” or “`”) on the top left side of your keyboard. The console follows a toggle procedure, meaning pressing the tilde key for the first time will open the console, and pressing it the second time will close it.
Using the tilde key as the console hotkey is universally used by nearly all Counter-Strike players, but there is also an option to change the hotkey if you want it somewhere else.
How To Change Console Hotkey
In case you are using the tilde key for another option, or simply want to change the hotkey for opening the console, you can follow the procedure below:
- Launch the Counter-Strike 2 client.
- Go to the Settings page by clicking the gear icon on the top left corner of your screen.
- Next, go to the Keyboard/Mouse section.
- Scroll down to the UI Keys section.
- Look for “Toggle Console” and change the key to a different one.
Simple Console Commands For You To Start With
As you play more Counter-Strike, you will slowly learn more useful commands to put in your arsenal.
Here are some of the most common commands that you can start learning:
- fps_max 0: Removes the FPS limit on your computer, allowing for maximum frames per second.
- cl_showfps 1: Displays an FPS counter on the corner of your in-game screen.
- disconnect: Makes you disconnect from the game without having to click any settings buttons.
- quit: This command instantly closes your Counter-Strike client without having to click any settings buttons, making it the fastest way to restart your game.
- volume 0.X: Adjusts the master volume by using a console command. Replace “X” with a number value. For example, 0.5 is equal to 50% volume.
- sv_cheats 1: Enables cheats in private servers. Will not work in official Valve matchmaking servers.
- bot_kick: Kicks all bots from a private server. Will not work in official Valve matchmaking servers.
There are hundreds of other useful commands that can help players improve their computer’s performance, customize their settings and binds, and optimize their private server for practice or 1v1 sessions. Overall, the console is a potent tool to increase the quality of life for CS2 players.