
Within Counter Strike 2 you can apply stickers to your weapon skins, enhancing the look of the weapon. Below is a guide on how you can apply stickers and remove stickers in Counter-Strike 2.
CS2 has completely replaced CSGO, and with its new engine update, skins and stickers now look even better.
Counter-Strike is one of the biggest franchises for a competitive FPS shooter. It is known for its tactical encounters and sticker and skin market, which can be traded with other players.
With Skins & Stickers that can go for a hefty price tag due to their long history, you may want to apply stickers or remove stickers from your skin.
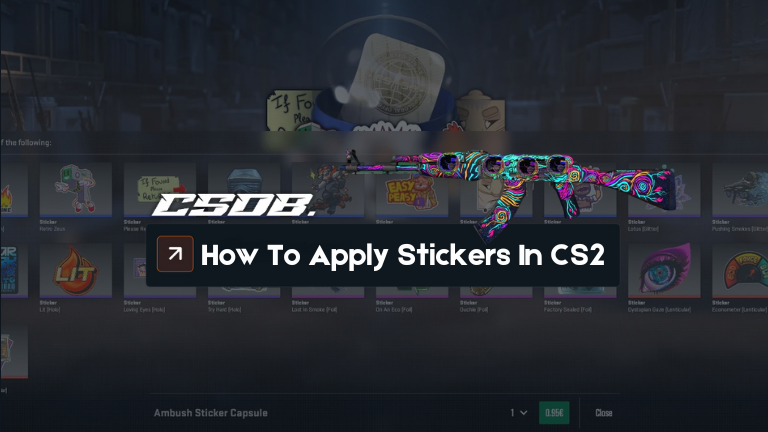
How To Put Stickers On Weapons In CS2
To apply a sticker you can do so by finding the sticker within your inventory. It’s a very simple process to apply stickers, we will show you how you can do that.
To apply a sticker simply follow these steps:
- Go to your inventory and choose the weapon, to which you want to apply the sticker..
- Click on the weapon and select “Apply Sticker” This will bring up all the stickers you own.
- Pick your sticker and click on the “Continue option” to apply it to the weapon.
- You can then position the sticker in the pop up and choose where you want to apply it on the weapon by choosing the next position.
How To Remove Stickers in CS2
If you divide you no longer want it on your weapon, you can “scrap sticker” Once the sticker has been applied if you right-click you will see the option to scrap the sticker, once this is scrapped the sticker will be permanently deleted from your inventory. For more information on removing stickers see our guide on that.
We hope this covers everything you need to know about applying and removing stickers within CS2. For more on the game feel free to see our other guides.