Nuke
A vertical map with upper and lower bombsites inside a nuclear facility. Heavily CT-sided, Nuke requires excellent T-side coordination and utility mastery to break through layered CT defenses.
Map Radar
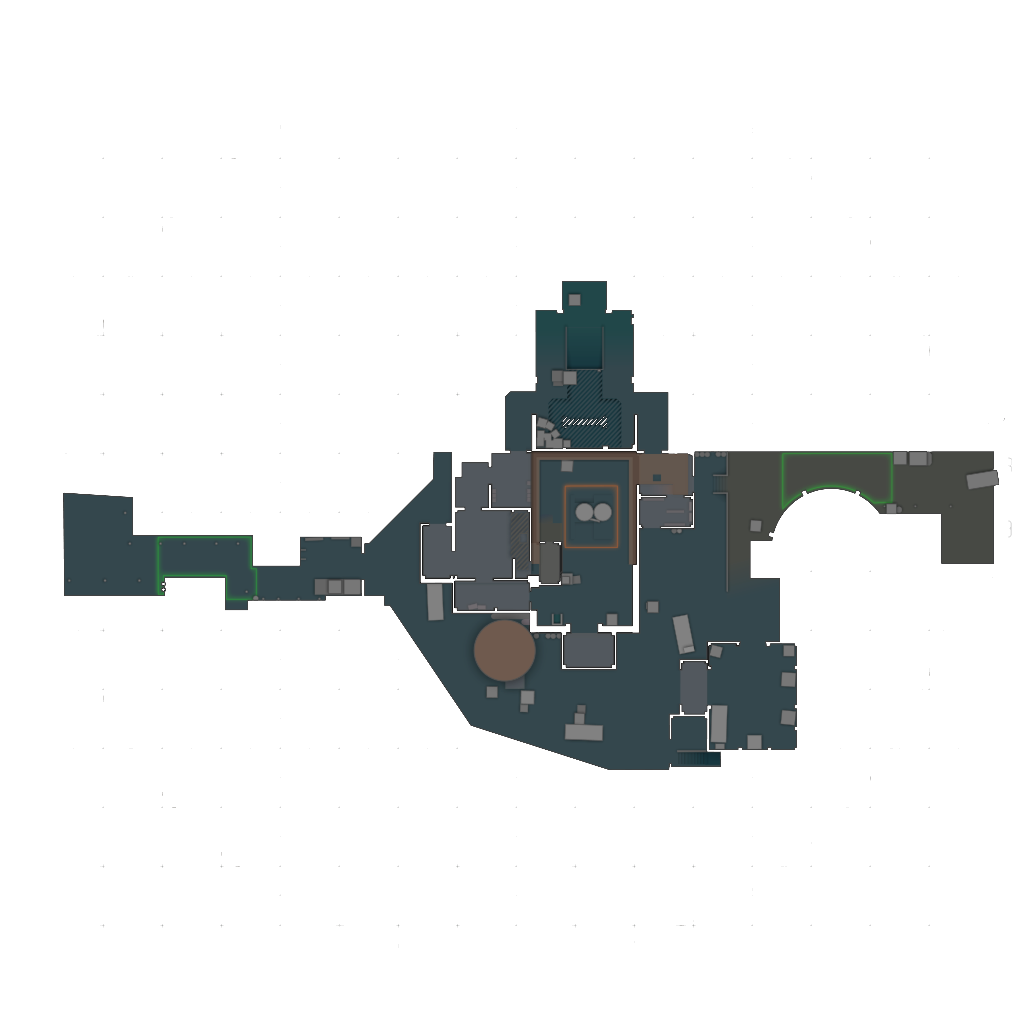
All Callouts (19 positions)
CT Side (10)
A Site (Upper)
Upper bombsite. Multiple angles from heaven, hut, and main.
Heaven
Elevated catwalk above A site. Dominant defensive position.
Hut
Small hut structure on A site. Cover position near plant zones.
Main
Main entrance to A site. Primary approach from lobby.
CT Red
Red container area near CT spawn. Rotation cover.
CT Spawn
CT starting area between sites. Quick rotation hub.
B Site (Lower)
Lower bombsite in basement. Tight angles and limited access.
Dark
Dark area in B site basement. Sneaky defensive position.
Vents
Ventilation shafts connecting upper and lower. Unique vertical route.
Decon
Decontamination room near B. Tight corridor defense.
T Side (6)
T Spawn (Yard)
T starting area in the yard. Open area with routes inside.
Lobby
Main lobby entrance. Primary route to A site.
Ramp
Ramp from outside to lower B. Key B approach route.
Secret
Secret passage near ramp. Alternative B approach.
Silo
Silo structure outside. Landmark for outside plays.
Outside
Exterior yard area. Outside control is T-side priority.
Mid Control (3)
Garage
Garage area connecting outside to inside. Key chokepoint.
Radio
Radio room between areas. Information position.
Trophy
Trophy room connecting areas. Rotation path.
Tactical Tips
Nuke is very CT-sided. T-side needs perfect utility and coordination to win rounds.
Control outside. Yard control is essential for any T-side strategy on Nuke.
Learn vent plays. Vents connect upper and lower, enabling surprise rotations.
Practice ramp smokes. Ramp control is crucial for lower B takes.
Use sound wisely. The vertical layout makes sound information very important.
Common Strategies
T-Side Attack
A Lobby Rush
Fast lobby push with flashes. Smoke heaven, molly hut. Overwhelm A site.
Ramp B Execute
Take outside control, push ramp to lower B. Smoke and molly key positions.
Vent Fake
Show presence at A through lobby while players push ramp to B through vents.
CT-Side Defense
Heaven Anchor
Play aggressive heaven with AWP. Fall back on utility when pushed.
Frequently Asked Questions
- What are the key callouts on Nuke?
- Nuke has 19 major callout positions organized across CT side, T side, and mid areas. Learning these callouts is essential for team communication during competitive matches.
- How should CTs defend Nuke?
- CT defense on Nuke should focus on playing tight angles, gathering early information with utility, and rotating based on T-side executes. Crossfire setups and controlled aggression help maintain site control.
- What is the best T-side strategy for Nuke?
- The best T-side approach depends on your utility and team coordination. Default setups that gather information before committing to a site are generally safest. Fast executes work best when you have full utility.
- How important is mid control on Nuke?
- Mid control is crucial on Nuke as it provides rotation options and map control for both sides. Teams that control mid gain significant strategic advantage in round planning.
- What utility should I prioritize on Nuke?
- Prioritize smokes for key choke points, flashbangs for entry support, and molotovs for clearing common positions. Full utility on Nuke typically costs around $1000-1500 per player.