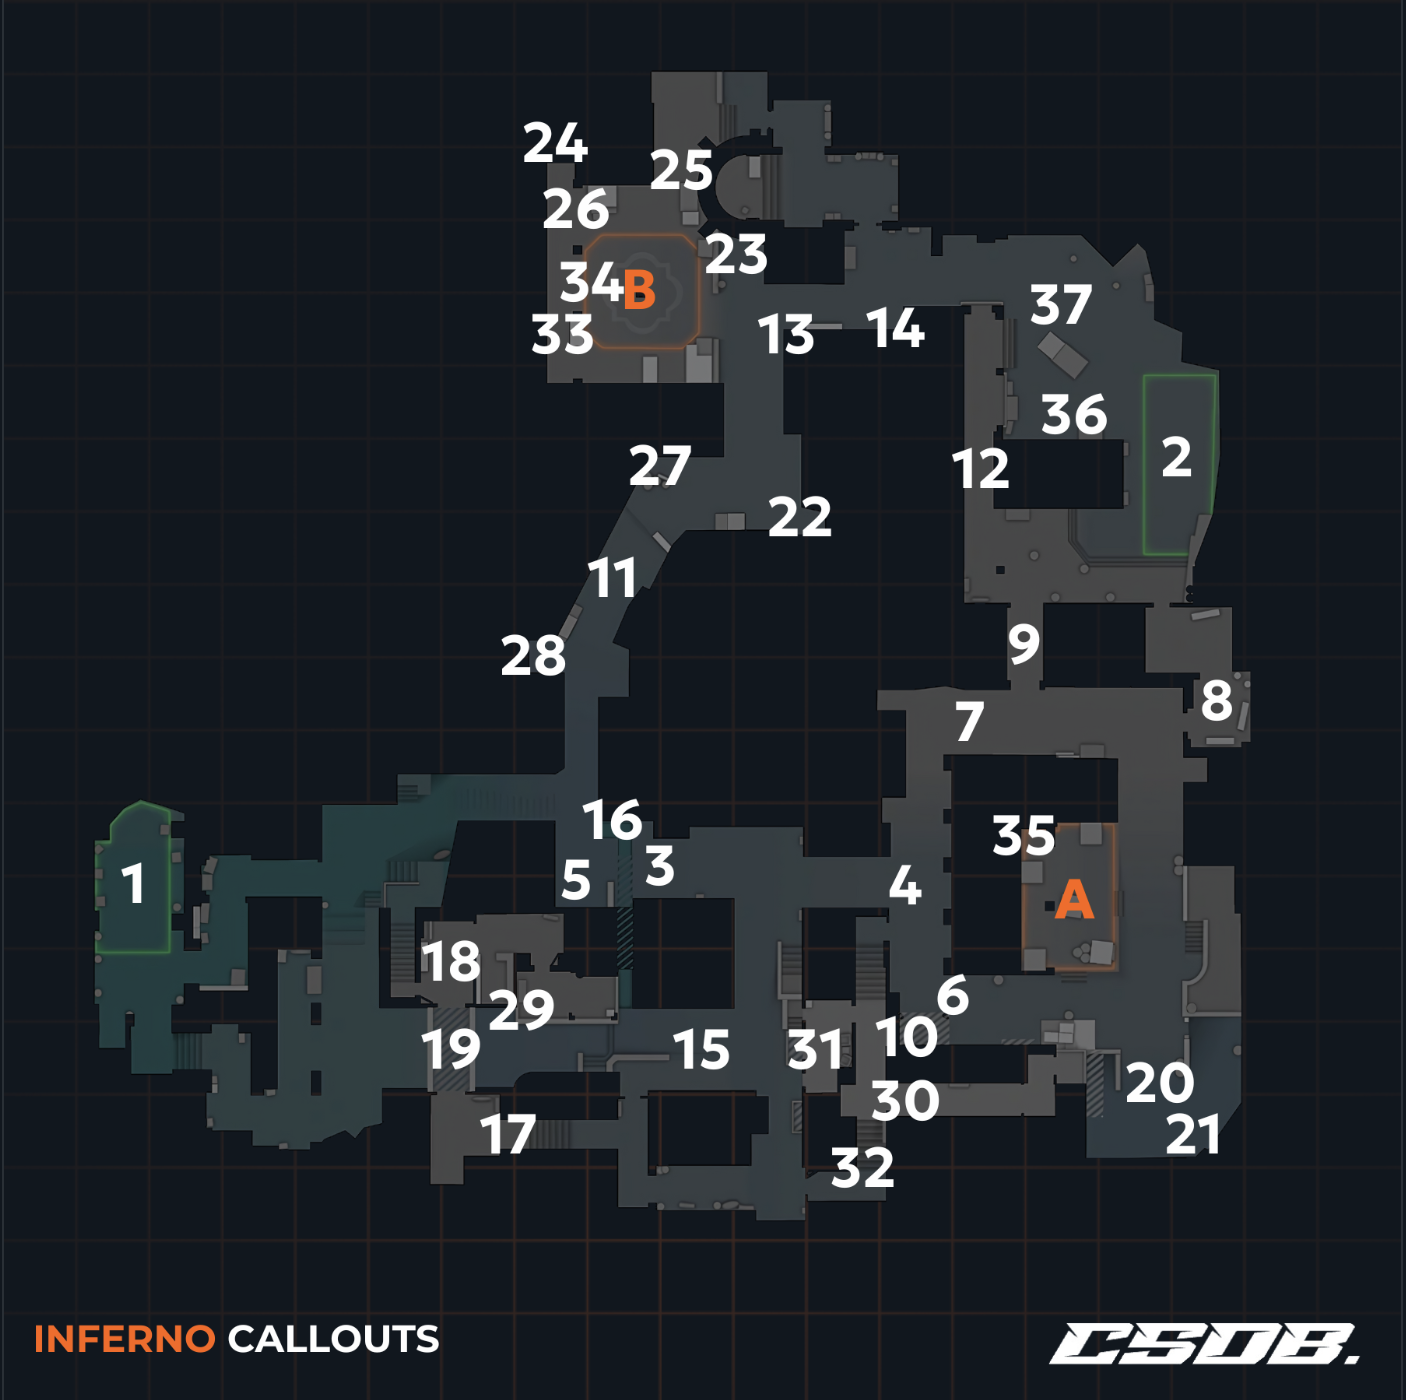
Inferno Callouts


-
1T Spawn: Starting point for the Terrorist side, offers routes to both bomb sites and mid
-
2CT Spawn: Counter-Terrorists' starting point, giving direct access to both sites and crucial areas
-
3Mid: A pivotal area offering various tactical approaches to both A and B sites through connector paths
-
4Top Mid: A common area for CTs to defend, giving them control over Mid and connector routes to both sites
-
5Bottom Mid: Near T Spawn, a strategic area where Underpass exits, crucial for controlling movements between Mid, T Spawn, and Second Mid
-
6A Short: Fastest route to A Site from Mid, allowing quick access but heavily contested
-
7A Long: Longer, more covered approach to A Site, used for strategic plays and flanking
-
8Library: Positioned outside A Site; strategic for controlling rotations between sites
-
9Arch: Connects Mid to both sites and CT Spawn, critical for map control and rotations
-
10Patio: A part of A Short, offering a less exposed route to A Site
-
11Banana: Crucial corridor leading directly to B Site, known for intense battles due to its narrowness and importance for map control
-
12Speedway: Fast route from Arch to B Site, essential for quick rotations and backup
-
13CT Boost: Boost spot near CT for an elevated view of B Site
-
14Tree: Dark corner providing concealment and tactical advantage opposite Construction's exit
-
15Second Mid: Alternative route to A Site, provides access to apartments with less exposure than mid
-
16Underpass: Lower passage connecting Mid to Second Mid, used for surprise attacks or quick rotations
-
17T Apartments: Complex area requiring careful navigation due to narrow passages and multiple entry points
-
18Living Room: Upstairs near T Spawn, transitional area leading to other key map points
-
19Bridge: Connects Living Room to T Apartments, offers a pathway over Second Mid
-
20Pit: Defensive stronghold under Balcony at A Site, offering protection and wide view of site approaches
-
21Dosia: Tactical spot within Pit for grenade usage, named after a player's notable play
-
22Sand Bags: At the back of Construction and top of Banana, used for strategic cover and controlling entry
-
23Grill: Near B Bombsite, known for close-quarter engagements and crucial in site retakes
-
24Dark: Shadowy corner at B Site, perfect for ambushes and surprise defenses
-
25Coffins: Positioned at the back of B Site, a crucial defensive area providing cover against attacks from Banana
-
26New Box: Defensive position within B Site
-
27Car: At Banana's top, providing cover and a tactical point for engagements
-
28Logs: At Banana's bottom, niche spot for hiding or initiating surprise attacks
-
29Balcony: Overlooks Second Mid and critical for players pushing from apartments to A Site
-
30CT Apartments ("Apps"): Dense with rooms, critical for defending A Site from apartment pushes
-
31Window: Offers a view into Second Mid, crucial for gathering information and delaying enemy advances
-
32Stairs: Connects different levels of CT Apartments, facilitates movement and defensive positioning
-
33Quad: Consists of boxes providing cover at B Site, key for both attacking and defending strategies
-
34Fountain: Central feature of B Site, often the focal point during site captures or defenses
-
35Back Site (A): Positioned far from Short, allowing defenders to engage enemies from a distance
-
36Terrace: Adjacent to CT Spawn, offers an overlooking position towards Well
-
37Well: Near CT Spawn, serves as a transition area towards B Site
Inferno Map & Details
Inferno is a bomb defusal map which is located in Italy it has been a fan favourite and a big classic since the release of the original Counter-Strike GO. It is one of the most popular maps and due to this reason it has gone through a huge graphical rehaul since the release of the game. This map is known for its CT sided features and its known to me more favourable for the Counter-Terrorists.
Inferno holds a special place in Counter-Strike history, having been a staple map since CS 1.1 and continuing in CS2. It offers diverse tactical opportunities for both Counter-Terrorists and Terrorists, ensuring an engaging gameplay experience.
To elevate your performance on this map, mastering the callouts specific to Inferno is crucial. Below, we’ve compiled a list of these callouts to help you navigate and communicate effectively during matches.
We have gone the extra mile to organize them neatly in different categories, which will make it even easier for you to memorize the callouts faster, so you can start using them as soon as today.
Check out our full list of callouts for the Inferno map below, available in CS:GO and CS2.
Full List of Inferno Callouts (CS:GO and CS2)
Here you have our full list of Inferno callouts with their corresponding descriptions, so you can identify them and use them effectively in your matches.
We have organized them in different categories so you can browse them easily, this will help you to understand better how they work and how you can use, allowing you to start implementing them in your tactics and strategies for CTs and Ts.