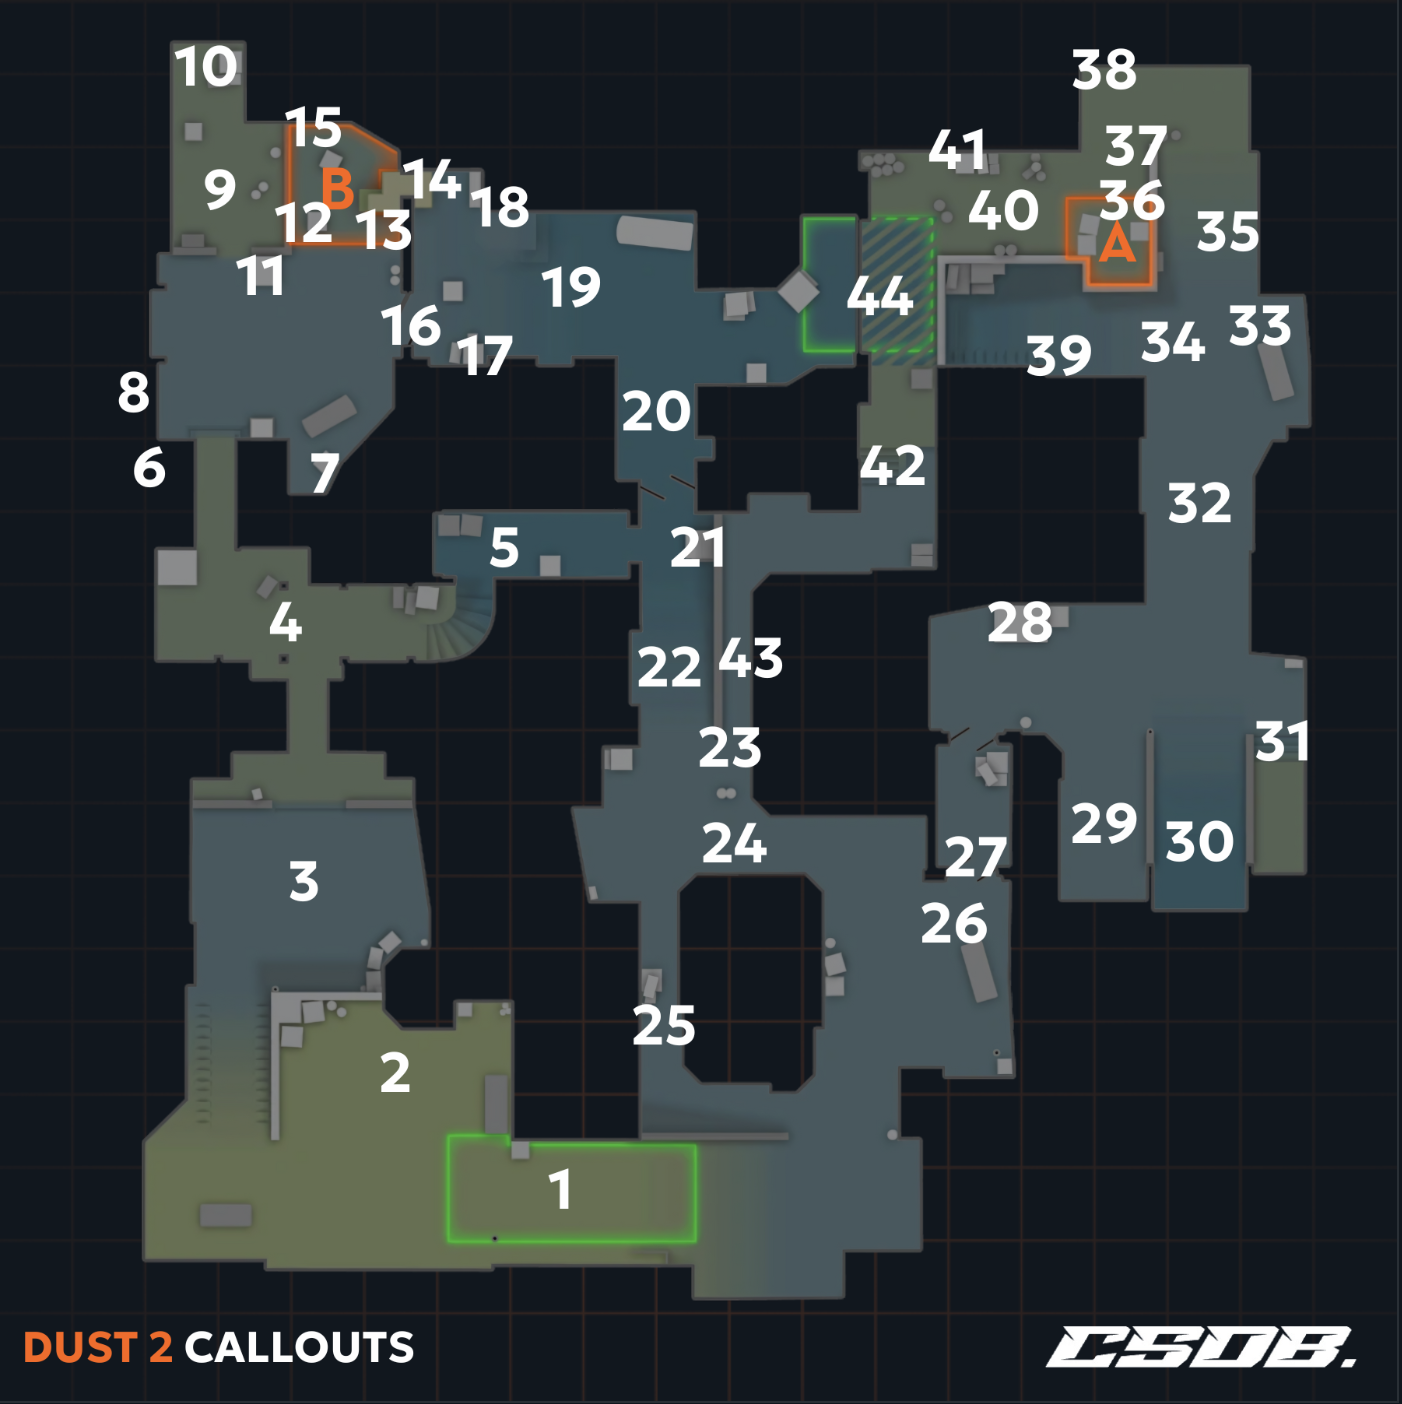
Dust 2 Callouts


-
1T Spawn: Starting point for Terrorists each round, crucial for planning the initial strategy of the round
-
2T Plat: Elevated platform near T Spawn providing a vantage point over T Ramp and the surrounding area
-
3Outside Tunnels: The exterior area leading to B Tunnels, often a congregation point for Terrorists pushing towards B Site
-
4Upper B Tunnels: Part of B Tunnels where Terrorists decide whether to continue towards B Site or pivot to Mid
-
5Lower B Tunnels: A junction within B Tunnels offering routes towards both B Site and Mid
-
6Close: A corner on B Site close to the entrance from Tunnels, often used by CTs for surprise engagements
-
7B Closet (or B Car): A corner on B Site that includes a car, providing cover and a strategic hold point
-
8Fence: A protective barrier on B Site offering concealment for CTs against Terrorists coming from Tunnels
-
9B Plat: An elevated area on B Site, essential for overseeing the Tunnels entrance and defending the bomb site
-
10Back Plat: A hidden area behind B Site, perfect for defensive plays and guarding against a retake
-
11Big Box: A prominent box on B Site that can be used for cover, similar in function to Xbox on Mid
-
12Double Stack: Two stacked boxes on B Site, providing an additional layer of cover and strategic positioning
-
13B Default Plant: The standard bomb planting area on B Site, commonly targeted in plant strategies
-
14B Window: A window on B Site offering sightlines to CT Mid and a path to jump through
-
15B Back Site: The area behind the B Site plant zone, facing the Tunnels entrance
-
16B Doors: The main passage between B Site and CT Mid, crucial for rotations and retakes
-
17B Boxes: Boxes located outside B Doors, used for strategic cover or to ambush enemies transitioning from B Site
-
18Scaffolding: Construction structure in CT Mid opposite B Window, often used as a tactical waiting area
-
19CT Mid: The middle area between CT Spawn and B Site, a battleground for mid control
-
20Mid Doors: Large central doors at Mid, a focal point for sniper duels and quick rotations
-
21Xbox: A large box in Mid that players can use to jump to Catwalk, crucial for accessing A Short
-
22Mid: The central corridor of Dust 2, linking T Spawn to CT Mid, vital for map control
-
23Palm: Now marked by a telephone mast at the beginning of Mid, near Catwalk, where a palm tree once stood
-
24Top Mid: The area near T Spawn at Mid, serving as a staging area for assaults on Catwalk or A Short
-
25Suicide: A risky path from T Spawn to Mid, exposed to sniper fire from CTs at Mid Doors
-
26Outside Long: The area approaching Long Doors from T Spawn, a typical route for Terrorists
-
27Long Doors: The double-door entrance to A Long, a critical choke point contested by both teams
-
28Blue: A large crate opposite Long Doors, offering cover when moving towards A Long
-
29Side Pit: A niche near Pit adjacent to Long Doors, providing a tactical position for ambushes
-
30Pit: A key area along Long with a downward slope, providing a strong defensive position against attackers from Long Doors
-
31Pit Plat: An elevation near Pit, allowing players, especially snipers, to oversee A Site and A Long
-
32A Long: The lengthy corridor leading to A Site, a major route for Terrorists coming through Long
-
33A Car: A strategically placed car on A Long, offering cover for CTs to engage Terrorists
-
34A Cross: The intersection area visible from A Short, A Long, and A Site, critical for crossfire setups
-
35A Ramp: A sloped area leading up to A Site from A Long, used during site assaults and retakes
-
36A Default Plant: The preferred planting area on A Site marked by a visible 'A'
-
37Barrels: Located behind A Site, used for cover and strategic positioning during site holds
-
38Goose: A closed-off area at A Site known for its distinctive goose graffiti, ideal for close-quarters defense
-
39Elevator: A corner of A Site near CT Spawn, used frequently in retakes to access A Platform
-
40A Platform: The main area of A Site where the bomb is often planted, crucial for holding and defending A Site
-
41A Ninja: A concealed spot on A Platform, often used for stealthy defuse attempts
-
42Stairs: Connecting Catwalk to A Short, these stairs are pivotal for facilitating movements between Mid and A Site
-
43Catwalk: Elevated path from Top Mid to A Site, crucial for A Short pushes
-
44CT Spawn: Counter-Terrorists' starting area, close to both A Site and Mid
Dust II Callouts Organized by Categories
To make it even easier to navigate all the available callouts for this map, we have divided them in the following categories:
Terrorist Spawn Area:
- T Spawn
- T Plat
B Site and Its Approaches:
- Outside Tunnels
- Upper B Tunnels
- Lower B Tunnels
- Close
- B Closet (or B Car)
- Fence
- B Plat
- Back Plat
- Big Box
- Double Stack
- B Default Plant
- B Window
- B Back Site
- B Doors
- B Boxes
Mid Control and Key Points:
- Xbox
- Mid
- Palm
- Top Mid
- Suicide
- Scaffolding
- CT Mid
- Mid Doors
A Site and Long Approach:
- Long Doors
- Blue
- Side Pit
- Pit
- Pit Plat
- A Long
- A Car
- A Cross
- A Ramp
- A Default Plant
- Barrels
- Goose
- Elevator
- A Platform
- A Ninja
Catwalk and A Short Access:
- Stairs
- Catwalk
Counter-Terrorist Spawn Area:
- CT Spawn
Examples on How to Use Dust 2 Callouts
So you can learn how to use all of these callouts effectively in Dust II, here you have an example for each, CTs and Ts.
Using Dust 2 Callouts for CTs
A CT player at “B Plat” sees terrorists coming from “Upper B Tunnels” and another group from “Mid.” They shout, “Multiple Upper Tunnels and Mid rush!” alerting teammates. Meanwhile, a CT at “CT Mid” watches “Mid Doors” from “Scaffolding,” while another near “B Doors” gets ready for a fight, saying, “Need support at B Doors!” This coordinated effort, guided by clear callouts, helps the CTs position themselves well against the split attack.
Using Dust 2 Callouts for Ts
As the Terrorists advance, the player leading the push through “A Long” spots a CT near “Pit.” They quickly warn, “One in Pit, watch out!” Meanwhile, another Terrorist pushing “Catwalk” sees a CT heading to “A Ramp” from “Catwalk” and notifies the team, “CT heading to A Ramp from Catwalk.” These callouts help the Ts deploy smokes and flashes precisely, like a smoke at “A Cross” to block “A Site” view and a flash towards “A Ramp” to disorient defending CTs.